Wednesday, August 15, 2012

Dena's Wreath


Black, White and Pink Wreath

This is one of my favorite pinterest projects this year. It was also very simple to make! I gave it to my friend for a birthday gift. 

 
Sorry about the horrible picture
 
First, you will need to gather a few supplies at the craft store.  I bought all of my supplies at JoAnn's Fabrics.  I got some fabric, felt, and pins.  That's all you need! 


I cut strips of the fabric and then wrapped them around the wreath.  I secured them with pins.  After that I made the flowers.  I traced circles for the flowers with a ribbon spool.  If you need a tutorial on making the flowers please read my post with the Blue Wreath.  


How to make the flowers                     
I used pearl buttons to make the middle of the flowers and secured them with a white tipped pin.  It took about an hour to make.  Very easy and cute!


Thursday, August 9, 2012

New Camera


My new obsession!  I am adding a new section to the blog because I have a new hobby!  I recently was given the Nikon D5100 camera as a gift from my loving husband.  Thank you Brian!  Anyways, I thought I would share some of my favorite pictures that I took in my garden.  The new camera is going to enhance our blog too!


Wednesday, July 25, 2012

Decorative Balls


A simple and easy way to add texture and color to a room or table top.  You can use these decorative balls pretty much anywhere! I purchased this set at Target and the bowl is from Macys.  I use them on my entryway table.  I am currently working on a pinterest project for the wall behind the table.  Happy crafting and decorating!

K.I.S.S. 
-Sarah 

Monday, July 16, 2012

Blue and White Wreath


Blue and White Wreath

I wanted to make a wreath to hang on our door for the spring.  Well...it is now a summer wreath because I was so busy in the spring.  Here is how I made it:

MaterialsFoam wreath, 8-10 pieces of felt squares, 2 yellow buttons, 2 gray buttons, pins, fancy pearl pins, & yarn.  

Procedures: 

1. Decide on your yarn colors.  I found it easier to cut a handful of yarn to wrap around the wreath.  To begin, pin the yarn and wrap.  Then, pin again at the end. 


2.  When you are finished wrapping the yarn you will need to cut felt circles for the flowers.  I used a spool of ribbon to trace my circles with a pencil.  I found that you could cut 2 sheets of felt at a time by pinning then together. 


3.   To make the flowers I folded the circles to create flowers.  First, I outlined the ares where I wanted to flowers to be placed.  Then, I started folding and pinning the flowers into place using small pins.  


4.  The last step was to add embellishments.  I used buttons that I bought at JoAnn Fabrics.  I pinned the two buttons together using fancy pins.  It was easy! 


I hope you enjoy your new wreath!  This project was pretty easy and did not take too long.  :)


K.I.S.S.
-Sarah


Saturday, February 11, 2012

Valentine's Day Heart Wreath Decor


Pin It

ANOTHER WREATH!!


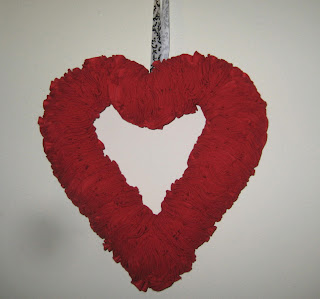
If you haven't noticed, I have been on a bit of a wreath kick lately. First the Christmas bulb wreath and now I found this super cute Valentine's Day felt wreath on on what else, Pinterest!!! 


Here's what you need and some easy-to-follow steps so you can make your own!

Supplies:
  • About 200-250 straight pins. I suggest getting some with a head like the one's picture below because the rounded end help dull the pressure on your fingers.
  • Red felt, about a yard (I used about 1.5 yards) because I placed my pieces closer together. In hindsight I would probably spread mine apart more to create a more textured look to the final product.
  • A Styrofoam heart to use as a base.
  • A circle stencil with a 3 inch diameter (use the top of a mug or mason jar etc.) I cut mine out of a Kleenex box so it was more durable.
  • A sharpie to do your tracing. I recommend using a red one so that it doesn't stick out on the edges after cutting each circle out.
  • Some quality scissors


Once you have your supplies you are going to need to trace out your circles on the felt and cut them out. You have to fold each circle in half twice. Here's how:


Then take a straight pin and pin it through the bottom of the point. Then stick the pin with the felt into the Styrofoam. Continue doing this placing each folded circle close together filling in the spaces. Continue the process for the whole wreath. You will not need to do this on the back of the wreath. Then I took a piece of black and white ribbon (about 8 inches) and folded it into a loop and pinned it several times into the back of the wreath to hang it from.


Here's my finished product. Sorry the picture is so terrible. I think it is about time for me to invest in a new camera! It really doesn't do it justice.


HAPPY CRAFTING!!!
Ashley :)

First Birthday Party Table Centerpiece

Difficulty Level: Medium
When my nephew turned one we kept the party low key.  For the food table centerpiece my mother made these adorable decorations.  The theme of the party was teddy bears.  We used a Styrofoam box and fabric to make the base.  Then, we cut die-cuts from the Cricut Machine (2 of each) and attached them to sticks.  This is the final result!!  It was super cute!! 

K.I.S.S.
Sarah

Gerber Daisy Bridal Shower

When planning parties it is important to develop a theme (colors, objects, etc.) For this shower, the theme was Gerber Daisies.  We had daisy plates, napkins, and accessories.  Take a look below for all of the goodies.  Also, see how I made the cute daisy wine labels!  This shower took place in 2010 - long before the blog idea.  I apologize for the lack of step by step pictures. Please contact us for more directions if you have questions at simplysophisticatedblog@gmail.com.

Gerber Daisy Shower Decor

The girls in the wedding and myself made many cute touches to add to the bridal shower.  We first decided to make these flower pots and place them all around the house where we held the shower. 

We needed the following supplies:  floral setting resin (found at your local craft store in the floral section), glue gun, fake flowers, and clear glass pots.

Difficulty Level:  Medium
First, you will need to cut the flowers down to a shorter length.  The shorter the length the better because if they are too tall then they will fall sideways and will not set properly.  After you have cut the flowers, stick a dab of hot glue on the bottom of the pot and glue the flower down.  This is important because the flower will have a foundation.  Once it is dry you can add the floral setting resin.  Let the resin set for a day or two and you are set to go. 

I must warn you, that this project can be somewhat frustrating if the flowers are not glued down before adding the "fake water."  If they are not set properly then they will fall sideways.  When setting the flowers put them in a box so you can easily move the box without disturbing the setting flowers.   

Advice Cards

At bridal showers it is fun to have guests write down marriage advice for the bride to have. To make these I typed up a quick and easy layout on my computer.  I printed them on white card stock.  Then, I used metallic card stock as the background. The flower in the middle is a fake flower that I glued on and put a gem in the middle.  It was quick and simple!  


Gerber Daisy Flower Pens
For directions on how to make flower pens please follow this link.

Difficulty level: Easy

 Flower Food Labels

I think it is important to label food at parties.  These were fun to make and were a perfect detail to add to the shower decor.  The bride and groom were getting married at a winery and the wine corks provided a nice detail to the event!

Difficulty level: Easy
You will need the following supplies: pre-cut flowers (you can purchase or make them on any die-cut machine), crafting glaze (found in the scrapbook section at your local craft store), card stock paper, markers, Flowersoft -Sunshine Yello (middle of the flower), and wine corks. 

First, you will need to cut your flower out of your die-cut machine.  I used the Sizzix machine for this project.  After you have cut all the flowers, add the glaze to the middle of the flower.  Before it dries, add the fluffy middle.  Let  them dry for a few hours and come back.  Once they are dry you can write the name of the dish on the label and cut the corks to slip the label into.  


Yummy Cupcakes

For dessert we served cupcakes, cookies, fruit, and the chocolate fountain.  Guests were treated to an array of dipping choices and they loved it!
The bride is known for her love of cupcakes.  Believe it or not, these cupcakes came from Sam's Club.  They were tasty and less expensive as local bakeries.  We were all treated to the fancy cupcakes at the wedding!


Bridal Shower Games and Prizes

Guests played three games during the shower.  We played bridal bingo, create a wedding dress, and the clothes pin game.  For the prizes, we bought lottery tickets and inexpensive gifts at the Christmas Tree Shop. 

How to play the wedding dress game: the group splits into small groups and uses toilet paper to create a wedding dress they think represents the bride's gown.  It is fun!  Here are some of the results!

How to play bridal bingo:  Guests fill in bingo boxes labeled "BRIDE" of gift they believe the bride will receive. While the bride is opening presents the guests will play bingo.  


How to play the clothespin game:  Choose a word guests cannot say.  If you hear someone say the word, take their clothespin.  The person at the end of the party who has the most pins wins!

K.I.S.S.
Sarah 


Prizes

Friday, February 10, 2012

DIY Bridal Shower Flower Pens

Bridal Shower Flower Pens

Flower pens are an easy and inexpensive favor for bridal showers.  They also come in handy for bridal shower bingo! Here is how you make them:


You will need artificial flowers with stems, green crafting tape, and some cheap pens from the dollar store.  


First, you align the flower stems to the pens.  Then, you wrap the tape around both of them.  Be sure to wrap the pens from bottom to top and at a diagonal.  This is important because the bottom of the pen become sticky if it gets loose and the tape begins to come undone.  


When you are finished, arrange them in a pretty container and a sign.  Enjoy!  


K.I.S.S.
Sarah


Monday, January 30, 2012

"I Do" Wedding Shoe Decal

Photo by wedding photographer
Pin It
When my boyrfriend's brother was getting married I told his bride, Jen, that I would love to do something special for her, for the wedding. I mentioned to her that I saw an idea on (what else) Pinterest about putting jewels on the bottom of her shoes. I mentioned it could be used as her something blue or in the matching pink of our bridesmaids dresses. This is the finished product!

I got all my supplies from JoAnn Fabrics. Here's what you need: 

Jolee's Crystallized Swarovski Elements (1 box of 42 pieces) in PINK
 
Jolee's Portable Hotfix Crystal Tool

Then I handwrote I DO and over it I added the jewels. They came out beautiful!

 HAPPY CRAFTING!!!
Ashley :)

Wine Cork Bulletin Board


This is a GREAT gift for a wine lover! My sister just moved into a new place and decided to decorate her kitchen with a wine theme. I was a little stressed with Christmas (being short on cash) but I knew I wanted to make her something special for her new place.

Once again I found this idea on Pinterest!! Here’s how I did it:

I found this frame (4 Way Adjustable Depths Project Frame) at Michael’s for $20 (before my coupon). The best part about it is that you can vary the depth depending on your project. This worked perfect because I could have the edge of my corks level with the edge of the frame.

I used a thick piece of black poster board and cut it to fit inside the frame. I then used a hot glue gun to glue the poster board to the glass.
Once everything was secure I began gluing on my wine corks. Fortunately a friend of mine had found a bag of used corks at a yard sale ($3) and gave them to me!! She was my savior! I glued each cork in place with my hot glue gun and quicker than you could say “cork screw” I was finished! My sister absolutely loved it! I would’ve liked to have made 2 matching ones, but I just didn’t have enough corks. Either way she loved it and I was thrilled at how easy it was!
HAPPY CRAFTING!
Ashley :)

Home Decor Seasonal Floor Vase Display

Pin It

My mom is quite the decorator! She loves to add little touches around the house and change things up as each season/holiday passes. This has been one of my favorite pieces of décor she has. She doesn’t have much money to work with and she prides herself on decorating within a budget. This floor vase was purchased at A.C. Moore. It was around $20 before her coupons. She got the lighted branches at Kirklands but they are being sold almost everywhere now. Then as each season passes she frequents the local craft stores for long stem flora additions. This is her winter display. You can see the different additions by looking at the close-up photos I included below. I will post her spring display once it’s up!


HAPPY CRAFTING!
Ashley :)

52 Reasons I Love You


52 Reasons I Love Him!
Pin It
I can’t confirm when my obsession with Pinterest started, but when I saw a version of this on the pin board website I was hooked! I knew I had to make it for my boyfriend!! I found some different versions online and ultimately decided to go about making mine a bit differently.
What you need:
  • A box of playing cards (try the Dollar Store)
  • Sandpaper
  • Dark red ink pad (I got mine from the dollar bin at JoAnn Fabrics)
  • Red/pink fine-tip sharpie
  • Vintage Labels -I searched for them online and found some great ones HERE
  • Glue stick
  • 2 binding rings
The hardest part of this project was thinking of the 52 reasons. For about a week I carried around a notepad and added my ideas as they came to me. Once I had them all I was ready to begin.
  • I started by sanding down the playing cards on both sides. This not only helped the labels to stick but also gave them an aged look I liked. Then I printed and cut out the labels.
  • I decided to handwrite the reasons because I thought it would make it more personal. I wrote down all my reasons and put them in an order I thought flowed best.
  • Then it was time to add a little detail to the labels. I used the ink pad to rub an edge on each of the labels before I glued them to the cards. This was pretty time consuming but in the end I just loved the personal touch it added. Each one looked a little different, but I was really pleased with how it came out.
  • Once all my labels were glued on I used one of the joker cards and punched 2 holes in it where I wanted them. I then used the joker card as a template to punch the actual cards so they all matched up.

Here is a picture of the final project! I am so pleased with how it came out and my boyfriend absolutely loved it!


HAPPY CRAFTING!!
Ashley :)